Sunday, 7 November 2010
Issues with filming
One of the main problems we had when it came to filming the trailer was getting the characters needed in the trailer to be at the same place on the same day. Many of are characters were either busy with work or school commitments on the day that we needed to film, to sove this we had to make sure what days and times everyone was free and we settled on 2 full filming days and an extra day incase we needed to re shoot any shots or add in any more scenes. Another difficulty we came across was the lighting, most horror trailers are set at night therefore the lighing is obviously dark, if we had to film at a different time to the previous filming day the lighting would be different, we solved this by editing the lighting on Adobe premier pro it helped us to make the trailer link together as it would look wrong if one shot was light and went straight to dark when there was no lead up to the different light changes. Apart from these two issues our filming went very well and we managed to avoid the bad weather at this time of year.

Re-shoot/Re-Edit
When cominng to the final stages of the completion of of horror trailer we relised we needed a dark and intense shot of the main male character to heighten the obessive stoyline. This was easy arranged by booking the camera and deciding the day the male character was free to film different angled shots of him. We also needed to re film the scene of the concerned friends, the first shot of this had diaglogue in the background meaning the main speech of that shot could not be heard. We got over this dilema by deciding to re shoot the scene, again we booked the camera and selcting the characters we needed making sure they wore the same clothes as they had previously worn on the film shooting day.
Editing Process


This is a screen shot of Adobe Premier Pro where after every filming session, we uploaded the footage filmed to this software. Once the footage had been uploaded we dragged the shots we liked into the editing/work area which is shown in the screen shot with each individual green box, we then editing each individual shot to the standard we wanted, this ment changing effects such as lighting and speed as well as cutting the shots to shorten the clip. To use this effects we had to select them from the toolbars and drop down menus on the left hand side on the screen shot above. The most frequent effect that our group used was the brightning and contrast list as it was difficult to film at the exact same time on our filming days and at this time of year it gets darker earlier as the weeks go on, changing the lighting in each individual shot. By using this tool it allowed the trailer to look more fluent and that time hadnt gone forward or backwards unless we wanted it to appear like this. Also we felt that by darkening down shots it gave of the dramactic and eerie effect that are generally found in horror trailers. After we had edited the first few shots and had filmed the majority of our trailer, we started to put our shots in order of how we wanted the to appear, we did this by refering to our detailed storyboards and planning stages and ordered them according what our group thought best suited our storyline. The detail shot list that was created helped our group when filming as we could refer to it for help if we got stuck. By following our detailed storyboards and shot lists it made sure that we had filmed everything that we needed and wanted to be in our finished trailer. Once we had put our shots in order via the shot list and had done the majority of editing apart from the falling action where we needed to do fast paced editing and music, we uploaded our soundtrack. Next we began adding in still title slides that displayed captions to help the target audience follow the storyline, this also heightens the atmosphere we were trying to create. Once we had our basic trailer with the shots in order with captions in the correct place we began to watch our trailer through and see what improvements needed to be made. When we uploaded the song we knew if was over 3 minutes which exceded out trailer length and so we cut it right down to around one minute 30 seconds. To do this we used the Razor tool on the right hand side of premier pro and marked out the sections we needed to cut out. This was a very difficult and time consuming process as we needed to match the previous piece of music cut with the next. This needed to be perfect so that the audience would assume the song was fluent and sounded correct when played to our trailer. Although this was frustrating and errors were made at times we learnt how to better our new skill and edited our song to how we wanted it to sound. We then began to move our shots to fit the track. We left a couple of gaps in our trailer where we needed to film a few more shots when begining to finish our trailer, we new we had to film these it was just a matter of arranging time for the protaginist to act for us. Once we had filmed these final shots it was easy to slot this in to place, and adding our last affects to these final shots. The last few days of editing our trailer were very stressfull as we had to completly re edit our sound track as the tempo rose to earlier in our trailer according to our shot layout. To overcome this issue we repeated the first part of the soundtrack at the begining of the trailer which was the rising action, this alllowed the pace to increase at the correct point in the trailer. By having to repeat the track this again ment we had to arrange our shots correctly so it fitted the trailer, it also ment that we had to add sections of the song into the layer 'Audio 3' so that the song didnt have any gaps. This completed the editing of our horror film trailer.
Audience Feedback
I have put questions on my blog by using the poll tool, this was to help me find out what our target audience like and if they agree with the ideas we have come up with. The majority that took the poll agreed that they wanted to see music that was slow that builds up to get faster, we thought that this would work and by also anayalysing film trailers this was the most common music and relates to Freytag's pyramid. We asked the target audience for their opinion on potential film magazine names, Our group prefered 'The Cut' as it linked to a movie and also the editing of a movie making it clever and interesting. The poll results show that the audience prefered this name which made our group much more confident in using it. We also asked what they would like to see or what they expect in a horror trailer, the results showed that alot of people prefered to see a chase scene as well as a murder scene so we hope to encouperate both these ideas as well as our own into the trailer.
Detailed Storyboard
Our group put together all of our individual ideas and included the ones we thought worked best and well together. We have written and drawn in detail what is to be filmed and at what locations as well as certain shots that could potentially be used in our horror trailer. This will help us when we come to film our trailer as we can refer to which shots we have left to film, also when editing we can use it to help us have an idea of what order the sequence should be in, if any alterations need to be made this can be done on premier pro or we can re shoot a shot if we need to and then re edit our trailer.


Monday, 25 October 2010
Filming Locations
We are using a range of locations for our trailer to keep to the audicene interested as well as looking realistic as a film wouldnt use for example a single shot of a location throughout the whole of the film. Our main location is set in the woods where the most action and chase scenes will occur. By setting our main location in the woods the audience will associate this with a horror trailer as this type of location is used frequently in these genre films. As our trailer is based around a camping trip we will be using specific props within our trailer again making our trailer believeable to the viewing target audience. Below are the some of the locations that i have taken pictures of, that will feature in our final trailer.


Sunday, 17 October 2010
Target Audience
Our target audience are people who enjoy horror movies in general but also are interested in other film genres. People who are interested in our type of film trailer will be students varying from 16 to 25 and are in the working class sector. Our trailer is aimed at both females and males and this will be shown clearly in our trailer which will include both genders. This will be shown in our trailer through the characters clothing, the background music and the general mise en scene. To make our trailer stand out from other horror films we are using various locations with different angled shots and lighting which can also be edited on the editing software. In horror trailer and films the characters tend to wear dark clothing to emphasise the scary Ora, we will be incorporating this in our film trailer so the audience can recognise the genre along with the dramatic background music. Our group will eventually take out a questionnaire to our target audience to see what they think of our video and possible what they would like to see in a music video and if they think there could be any improvements, will we take these suggestions and apply them to our video to appeal even more to are target audience.
Saturday, 16 October 2010
Filming and Pro Mo Schedule
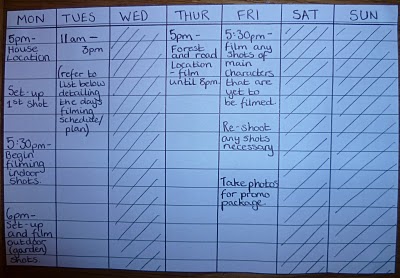
As you can see, here is a time table of when we can film our video. Me and my group spoke to the main characters and extras and discussed what days/nights we would be able to shoot the video. We also had to book the camera so we made sure we had a timetable to show when we would prefer to have the camera. We plan to film most of the video in the week commencing 18th of october, during this week we hope to take the promo package pictures. Then we hope to begin editing the trailer and therefore if we need to reshoot we have plenty of time before the deadline date. Although the times are a rough outline, it shows our group what time to meet so we have all the characters together. We have to make sure we have a range of shots and that they are well focused, by begining filming at this stage it allows us to correct any bad shots we come across.


Monday, 27 September 2010
OK GO! "This to shall past" and "White Knuckle"
This music trailer appears to be one long unbroken shot (like the famous scene from good fellows), However they use several effects to edit the video. A sequence of connective trials leading up to them getting splattered with paint. Similar to their oringinal video "here we go again" which consists of the same one set location making it incredibly cheap to make, the band also appears in their video which is a very common trait. Although it is cheap to create this video because if the one set location, their videos are highly effective, oringinal therefore making it unique and very memorable.
OK GO also all feaure in their music video white knuckle which they filmed in one take. The video feature "friends" which are highly trained dogs and are extremly well encorperarted into the music video. All of OK GO's music videos have wild ideas making them completly different from any other artist. Their most famous video that started this trend was "here it goes again" where the main focus is on them using tredmills and creating an amazing effect with them.
"White Knuckles"
Sunday, 26 September 2010
Initial Storyboard
This is a seris of ideas that I had to contribute to the group, this will help us as well as the other members of the groups ideas, to create our shot by shot storyboard and begin filiming with a helping aid. By having a further deatailed storyboard, it will help our group on location to guide us through how we want a particular shot to look like. It also shows how we have planned our trailer and not gone to any random location but a selected few to show our trailer off to its best. By having three sperate intial storyboards it measn we have several ideas to use and discuss which ones are the prefered and include them in our final shot by shot storyboard.


Saturday, 25 September 2010
Ideas for trailer
Our group created individual diagrams with ideas for our groups movie trailer, the diagram of intial ideas is shown below. It gives us an idea of the locations, actors and actresses that we can contemplate using when it comes to film our trailer. During our filming we will be using a range of shots so the audience will find it interesting to watch rather than focusing on a same angles shot for a long period of time which would be very boring and would not sell the film. The shots we will being using will include:
-Close ups
-Medium close ups
-Long shots
-Mid shots
-High and low angle shots
-Over the shoulder shots
Another ideas we have had include using different effects when we edit the film, such as darkerning downn shots to fit the genre of film also it is better to film lighter and then change the lighting if needs be, as some shots could be grainy if there shot in picth black. Another idea we had was to used quick editing in part of the trailer to make it tense and exciting also this fits in with Freytag's Pyramid. In our trailer we hope to include certain amounts of dialogue to fit the genre of a horror film. Most horror trailers have some speaking in it, so the audience can register what is going on with the characters. We will have a ery song (non diagetic) played throughout the trailer to add to the suspence, we will either find a suitable song or create our own by editing it together.

Focused Analysis 4: Locations, Silent Hill
In this film trailer the main location is set in the town of 'Silent Hill', and this is where the most action happens. In the rising action of the trailer the mother and daughter are in a car on a dark and hilly road, I like the idea of using a car in our horror trailer as it gives the sense that someone is following or watching you. The car also shows the begining of the journey which takes them to the main location of the film. Also in the trailer there is alot of filming in burnt buildings which indicates what has happened and this theory is confirmed when we are told there was a fire there 30 years ago. The burnt ery buildings cleary show it is a horror film and the loud, scary music adds effect to this. Our main Location for our film will be set in a woods, this is also a known location for horror films.
Focused Analysis 3: Mise-en Scene, I am Legend
The first shot we see is a high angle on the main charater in the bath tub there is quick editing with quite music we are then show the civilians of new york city, it is also zooming in on the location making the people below seem inferior. This can be also classed as a establishing shot as it is setting the scene. he captions and words of the character tell us the storyline. The lighting is very dim throughout the trailer especially when it is set in the dark. The music begins with a slight 'boom' sound telling the audience that its going to get tense. The editing here is slow and this is called the rising action as it is building up to the main point of the trailer. We are guided through a typical day of the main character, the soft music continues. A birds eye view shot is shown of the city which is a very interseting use of the camera. It is now night and the twist of the trailer is shown. The softer music stops and an ery music is played. Faster music begins and the editing is much quicker untill the last shot is shown and the music fades out and the realese date is shown.
Focused Analysis 2: Sound/Music, The Final Destination
The opening scene begins with the sound of cars which we are shown and no background music has began as yet. The first shot could indicate a film about racing but a few seconds into the trailer the beat of the music starts and we see the facial expression on the main chracters face which indicates something is not right. There is clips of the trailer with the Chracters talking which helps the audience understand what is happening this would be effective to use in my own trailer. When the scene starts to become tense the music heightens and becomes faster and louder which is common in most horror trailers. Alot of the music is what you can see, for example the cars crashing. However their is background music that emphasizes the action which is very effective. The film is about a character who can see disasters before they happen, My group had a similar idea but flashbacks of the past leading up to the event. When there is quicker editing in this trailer the music becomes more intense and faster pased again adding to the impact it gives of to the audience. The captions fade out and softer music is played which works really well together.
Focused Analysis 1: Characters, The Final Destination
I have chosen this Movie Trailer as i want to focus my close analysis on the Chracters used. Throughout the trailer there is clearly two main chracters in the video and this is shown by the focus on them, we are shown the main boy chracters imortance by clips of him telling the audience what is going to happen in the film. There is also friends of the main chracters starring in the trailer which is an idea we had for our own horror trailer, this will keep the audience interested as the chracters wont be repetative. The main chracters could be seen as attractive and it is implyed there is a close relationship between them which makes the audience watch the film to see if it develops further.
Thursday, 16 September 2010
Film trailer: Detailed Analysis of Pan's Labyrinth
The company name is the first piece of film to be shown in the trailer of Pan's Labyrinth, it fades in and out of the scene. This is to show the audience who created the film and if it's well know they are more likely to view the complete film. Music is played over the caption right from the beginning of the trailer this is the rising action (refer to Fretags pyramid). After this Four to five shots lasting around a second creating an atmosphere. The trailer is not telling us the story as it doesn't need to give out detailed information. The second caption in the trailer is very small which shoes the film is about action and creates a ery feeling. The background of the captions very much suits the atmosphere created, the captions also fade out to the next shot slowing the editing down. The next two shots are shown and again another caption is shown with the same background as previous captions. This is all building up to the long shot which lasts around 10 seconds and the music becomes quiet, the scene then becomes scary and loud music is played building a dramatic ending with everything speeding up including the editing and the music. Four lasts shots are shown with quick editing and then a shot where it fades out, this is so the audience can take everything in. There is a long fade from the final shot to the final caption of the films name, website address, release date and quotes from magazines and finally the music fades gently away.
Analysis of Arcade Fire music video
Arcade fire have conveyed a normal music video "we used to wait" using the the Internet/web 2.0. It is a standard video shown on www.thewildernessdowntown.com using google maps, you are asked to type in your address as a child and he video begins to play. This is where numerous windows begin to open with different locations, some which include the location of your address you have entered. You also have the opportunity to write yourself a postcard that you can eventually send yourself. The point of the video is to give viewers a chance to revisit their childhood memories and i think the video conveys this really well. Whatever address is entered there is one particular scene always shown, which is a man in hooded black clothing running along a street. After this shot numerous camera angles are used such as a bird's eye view of the address originally entered. This type of video is unique and very interesting which makes it stand out from any othe music video and this is what our group will have to apply to our trailer to make it different from the rest.


Thursday, 26 August 2010
Analysing a Music Video:
Song: Smack my bitch up
Artist: The Prodigy
Story: Unlike many dance videos this has a very clear narrative building up to the big twist at the end. The twist makes it more memorable.
Setting: Set in the clubs of Soho London also in her (the characters) flat and bathroom. This fits in with the title of the song as it makes it some what acceptable that its a woman smacking a woman up. This type of music would also be heard in the clubs of Soho meaning the setting fits the plot.
Characters: We don't see the band in the video like many dance videos you don't see the DJ or band however prodigy often appear in their music videos. The audience assume that the charater is a man hitting a woman but we find out that the twist is it's a woman hitting a woman.
Costumes: Sexy club outfits
Lyrics: Lyrics are minimal but has some reference to what happens in the video i.e. "Smack my bitch up".
Special effects: Mimimal special effects are used, there used to show that the charater is drunk because were not allowed to see the character only through her eyes.
Camera Angles: Point of view shot to hide the twist until the end, Looks fast as though time is in fast forward which matches the song/genre/club scene.
Analysing a Music Video:
Song: The Scientist
Artist: Coldplay
Year: 2002
Story: There is a clear narrative in this music video. The whole music video is set in reverse this is to help sell the band as it is unique, it also allows Chris Martin to be the hero as he is the only member of the band to star in it. It shows in reverse how he managed to have a car accident.
Setting: The setting is outdoors is multiple locations, such as fields, basketball court and alley ways.
Charcters: Mainly Chris Martin to sell the band as well as his girlfriend which fits the female audience as they like to see a love story.
Costume: The clothing is standard and casual which fits the genre.
Lyrics: The lyrics fit the plot of the Video and the mood of the sad love song.
Special effects: The music video is shot in reverse meaning Chris Maritn had to learn the song backwards so it appeared correct to the audience when it was played back. This adds interests to the video and makes it unique and individual making it stand out from any other Music Video.
Camera Angles: Close ups were important in this Video as it shows the emotion on the characters faces. There is also use of slow editing again this fits in with the plot of the video.
Analysing a Music Video:
Song: Buddy Holly
Artist: Weezer
Director: Spike Jones
Story: The music Video appears in an episode of Happy Days and therefore a detailed plot is not necessary. The selling point of the Music Video is that it is an episode of Happy Days.
Setting: Only one setting is used throughout the Music Video which is Happy Day's Arnold's which is a cafe/meeting point for the cast. By doing this, from a technical point of view, it would have been easier to edit old and new footage togeter as there is only one location.
Characters: We see the band in the Video which an audience would exspect to see, In the video the stars of Happy Day's appear as well as extras enjoying the music and representing the fans.
Costume: The band is dressed according to the era the show was set in, which is the 1970's, this helps them to blend in and not loom out of place.
Lyrics: The plot does not follow the lyrics.
Special Effects: There is two layers of film which are combined from old and new footage. This is so it appears as though the band were in an episode of Happy Day's.
Camera Angles: A close up of the band is used and of famous characters, Long shots are used to show that is it filmed on an episode of Happy Day's.
Subscribe to:
Posts (Atom)